DIY
Equipping a Tesla Model X with BlackVue’s Full HD dashcam
If you’re reading this, you’ve likely invested into arguably one of the most high-tech gadgets ever experienced in your life – a Tesla Model X. And if you’re anything like us, you’re probably wondering why Tesla included bells and whistles beyond what’s imaginable yet skipped out on a simple dashcam solution. After all, it’s widely known that a front and rear 2-channel dashcam is the best way to capture those beautiful Tesla road trip moments while also protecting yourself from unwanted circumstances.
Following our popular installation guide on how to install a BlackVue DR650GW-2CH dashcam on the Model S sedan, we decided to highlight some of the intricacies with accomplishing the same type of install on the Tesla Model X.
Unlike the Model S, the biggest challenge with accomplishing an elegant dashcam installation on the Model X is how to run wire across the vehicle’s expansive panoramic windshield. Though the original intention was to post a step-by-step installation guide like we did with the Model S, I have to preface this article by saying that we attempted to do it ourselves (most of it), but then sought professional help after being concerned over breakage of the thin plastic wire conduit that runs along the length of the windshield starting from the rear view mirror housing. That said, we’ll highlight important areas of the install, but would like to qualify the story by saying that we do recommend a professional installer.
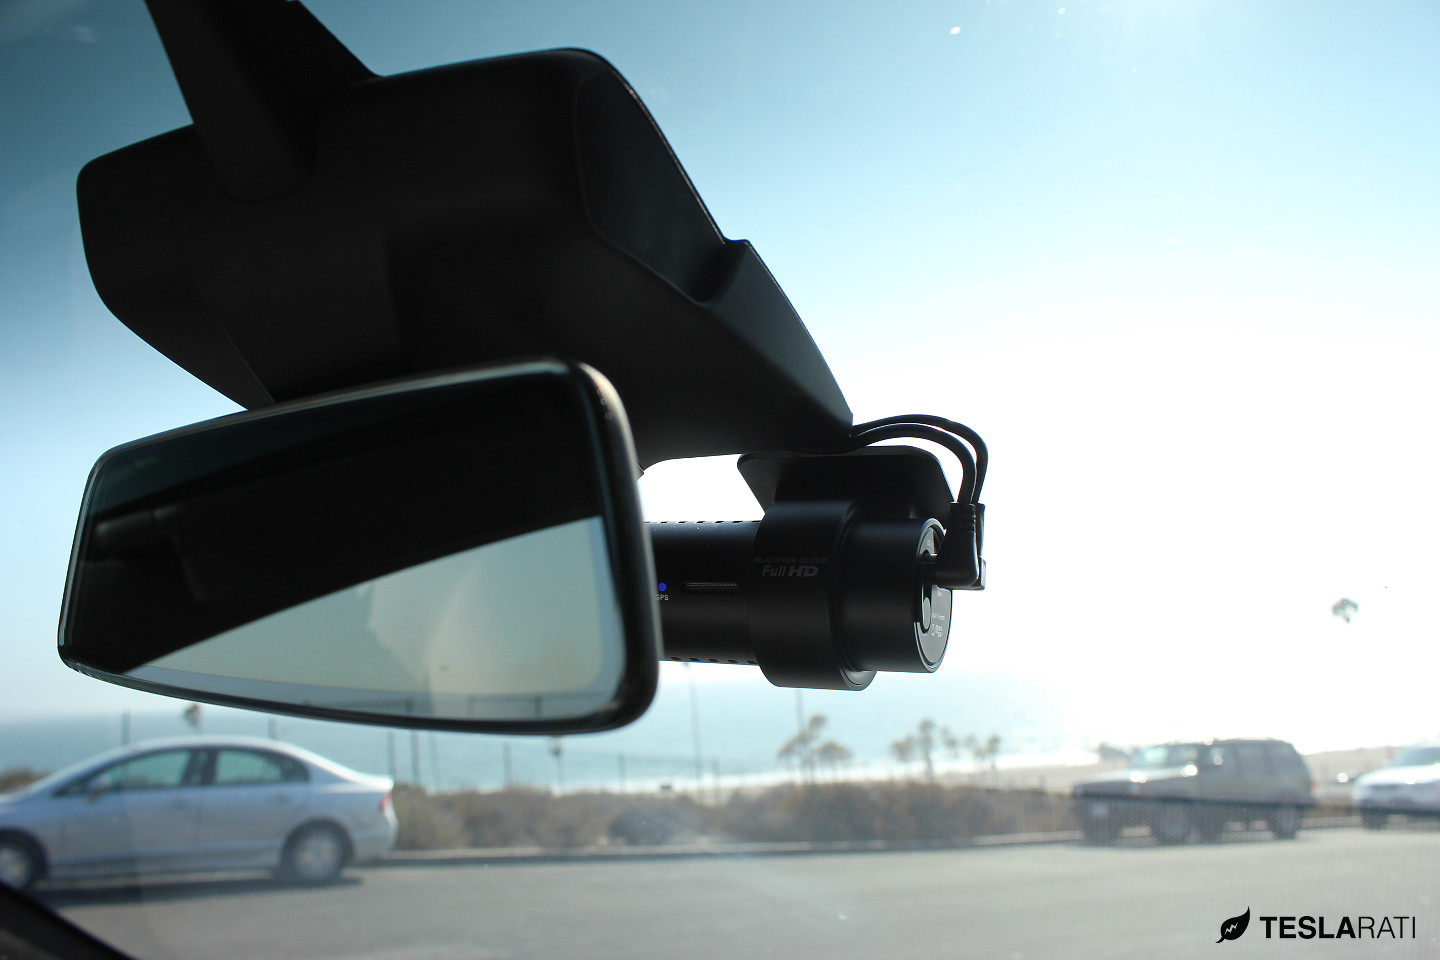
BlackVue DR650S Full HD Front + Rear Camera
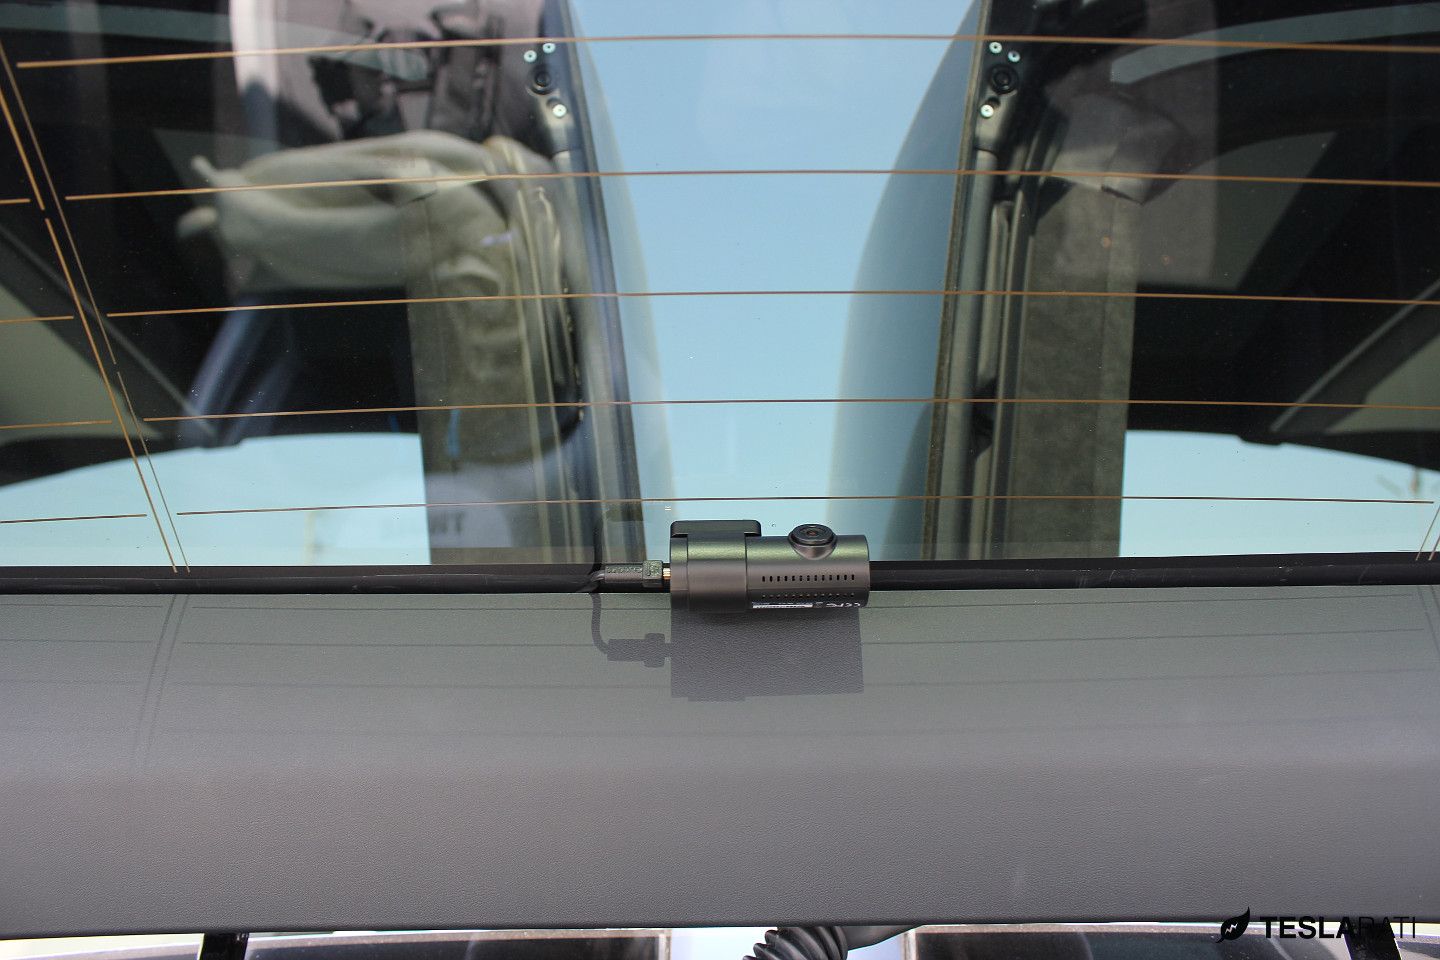
We picked up one of BlackVue’s newest Full HD DR650S 2-channel dashcams which shares very similar specifications with the popular DR650GW-2CH among Tesla owners, but has better rear camera controls. Everything else is virtually identical especially the form factor. The latest DR650S looks exactly like the DR650GW: same compact size, same premium feel, and the same front and rear bitrates – 10Mbps (front) and 5Mbps (rear).
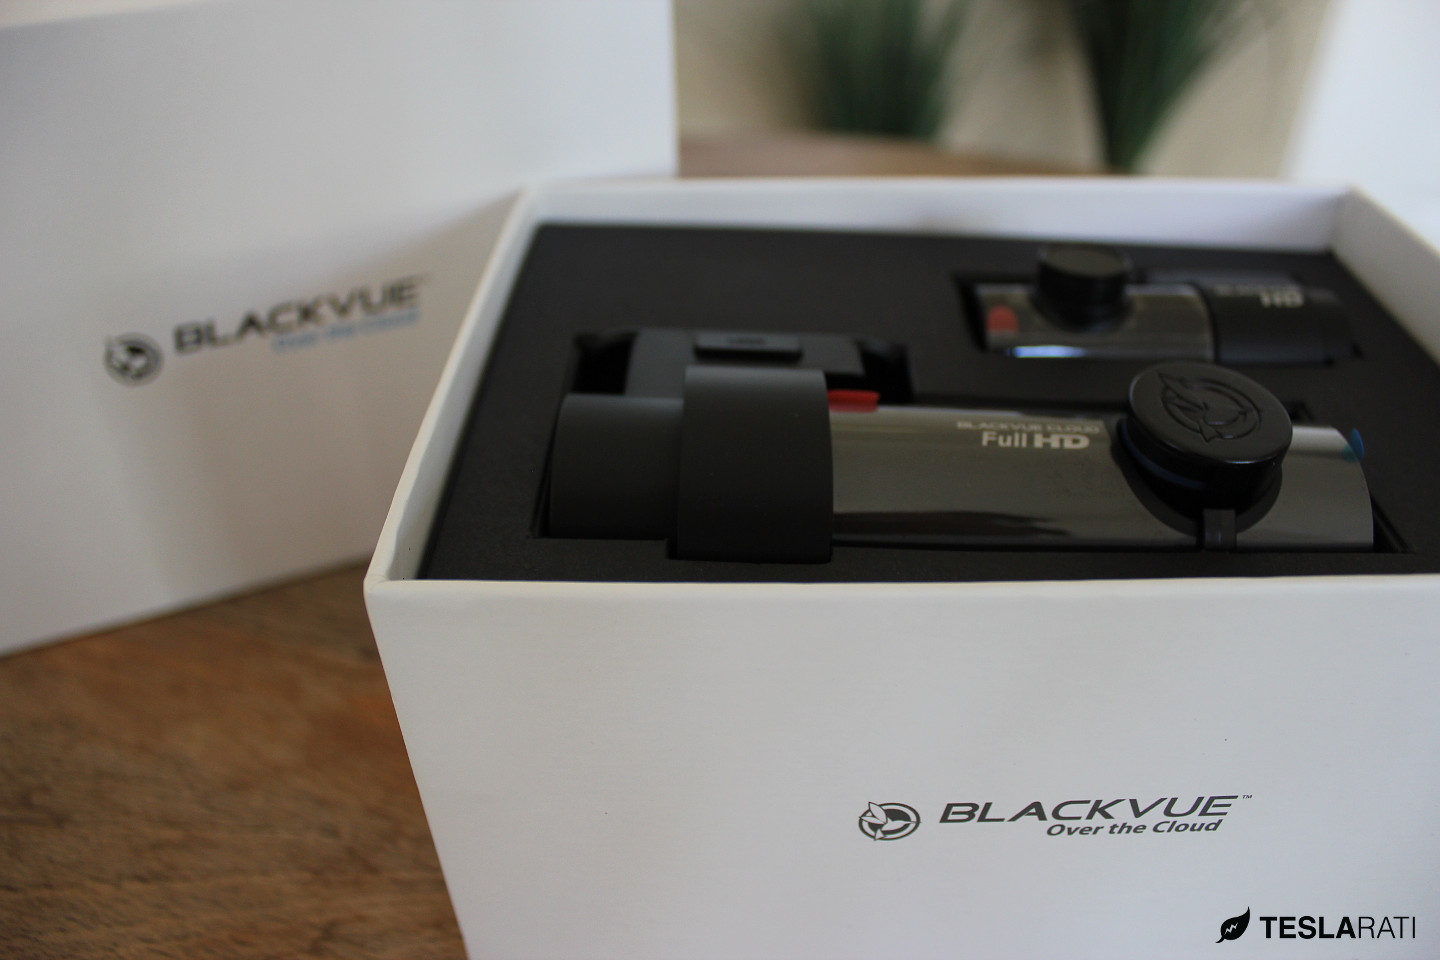
BlackVue’s DR650S-2CH uses a more compact box design than the previous DR650GW.
The DR650S-2CH includes both a Full HD 1080p front camera using Sony’s EXMOR CMOS sensor that’s capable of capturing footage at 30fps and a HD 720p rear camera. Beyond the technical jargon, the cameras simply shoot in amazing quality but also with a useful wide angle of view (129 degrees). Most Tesla owners that have BlackVue cameras, even the older generation DR650GW, will swear by it.
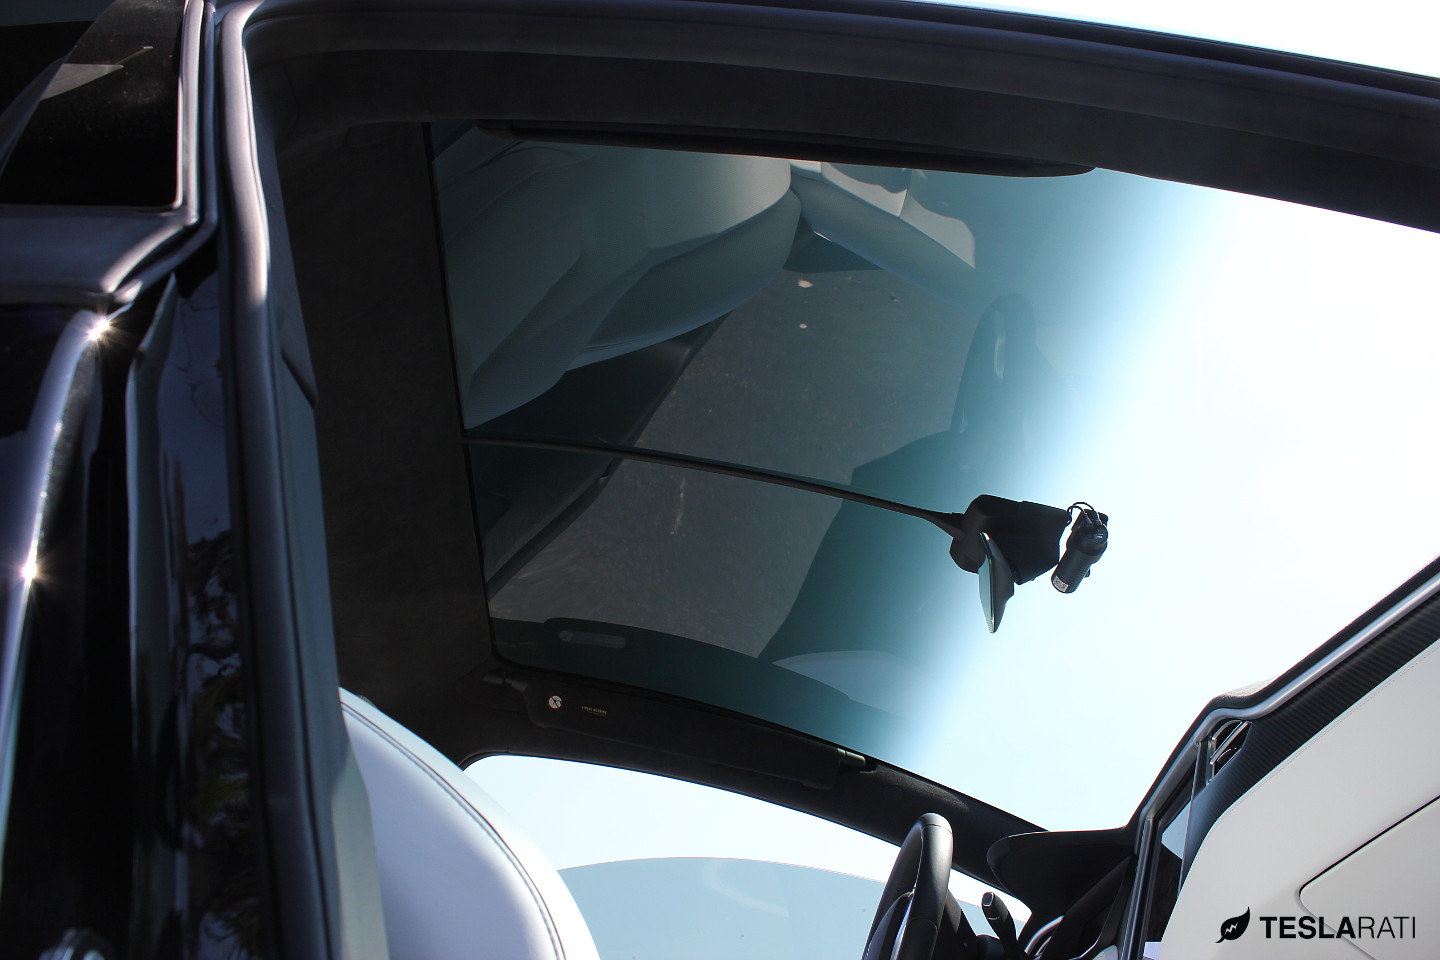
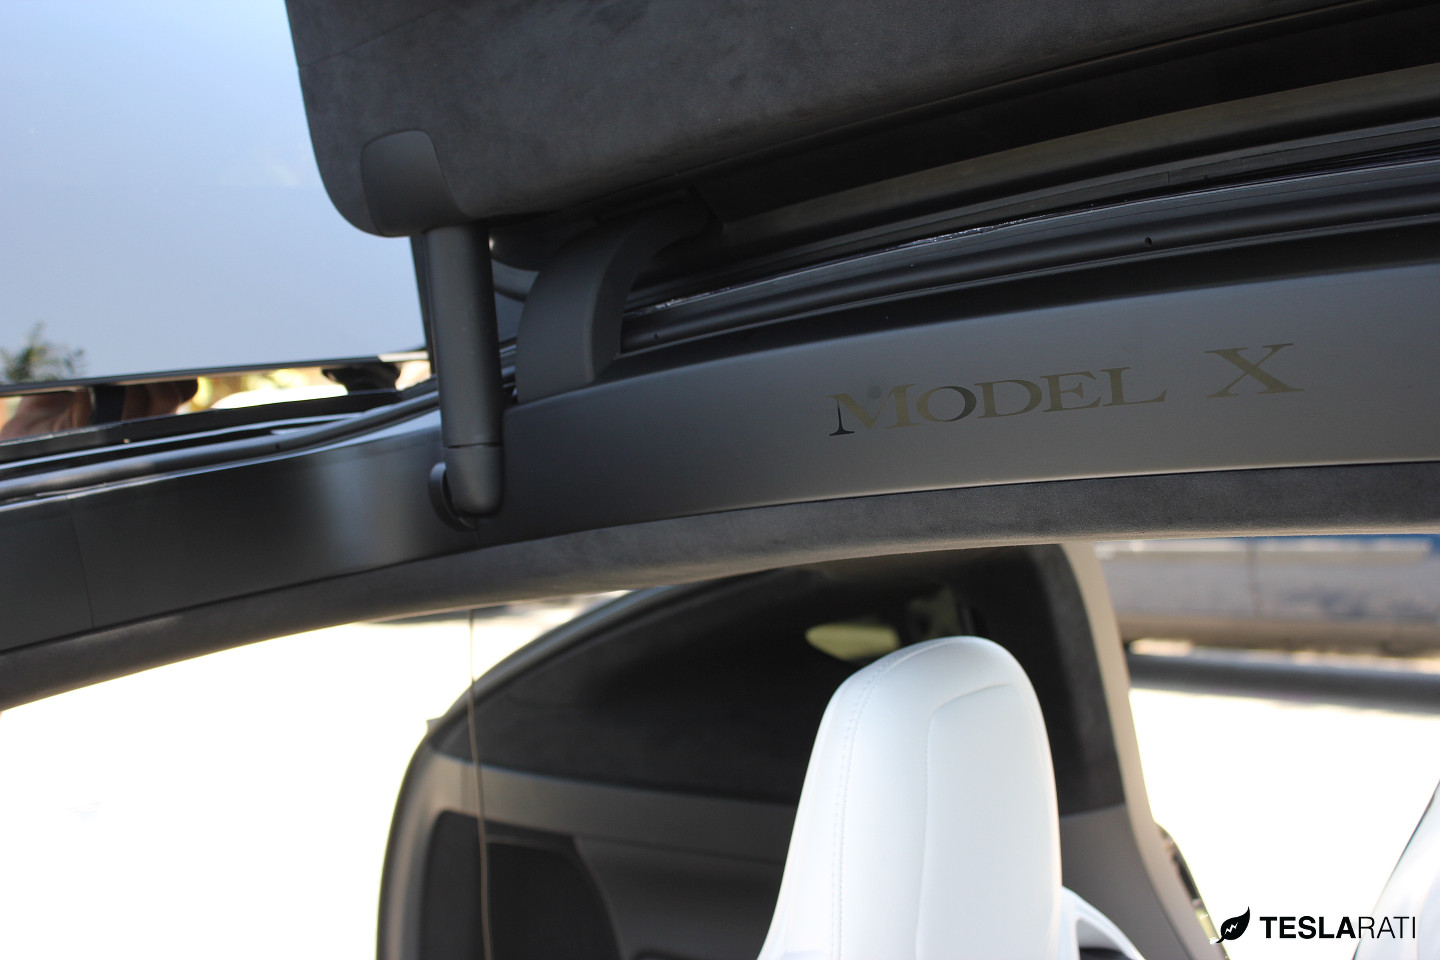
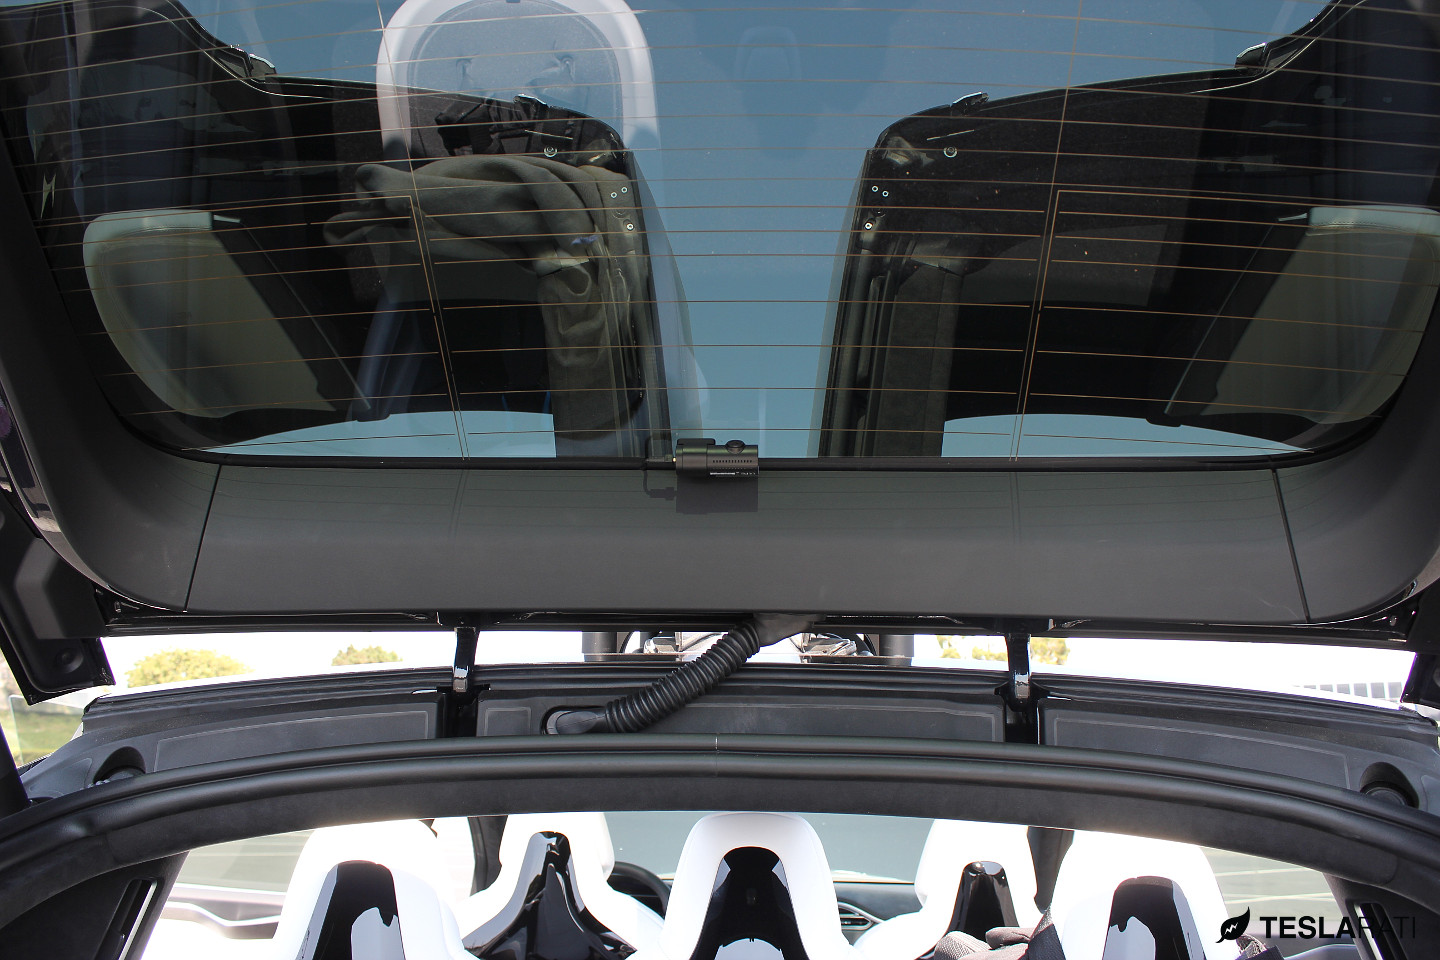
That Panoramic Windshield
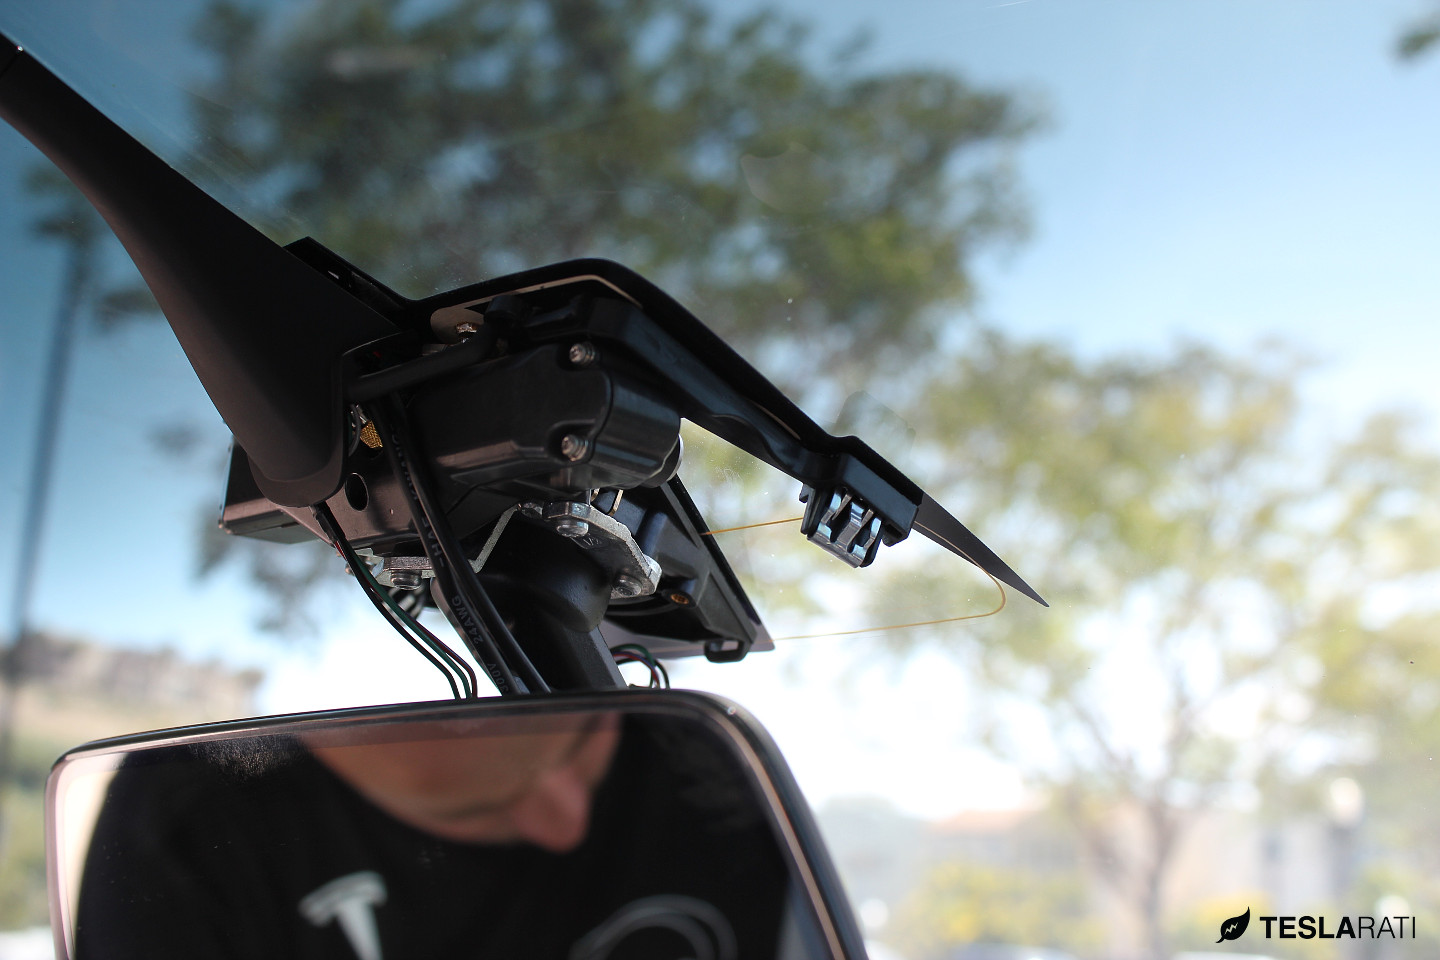
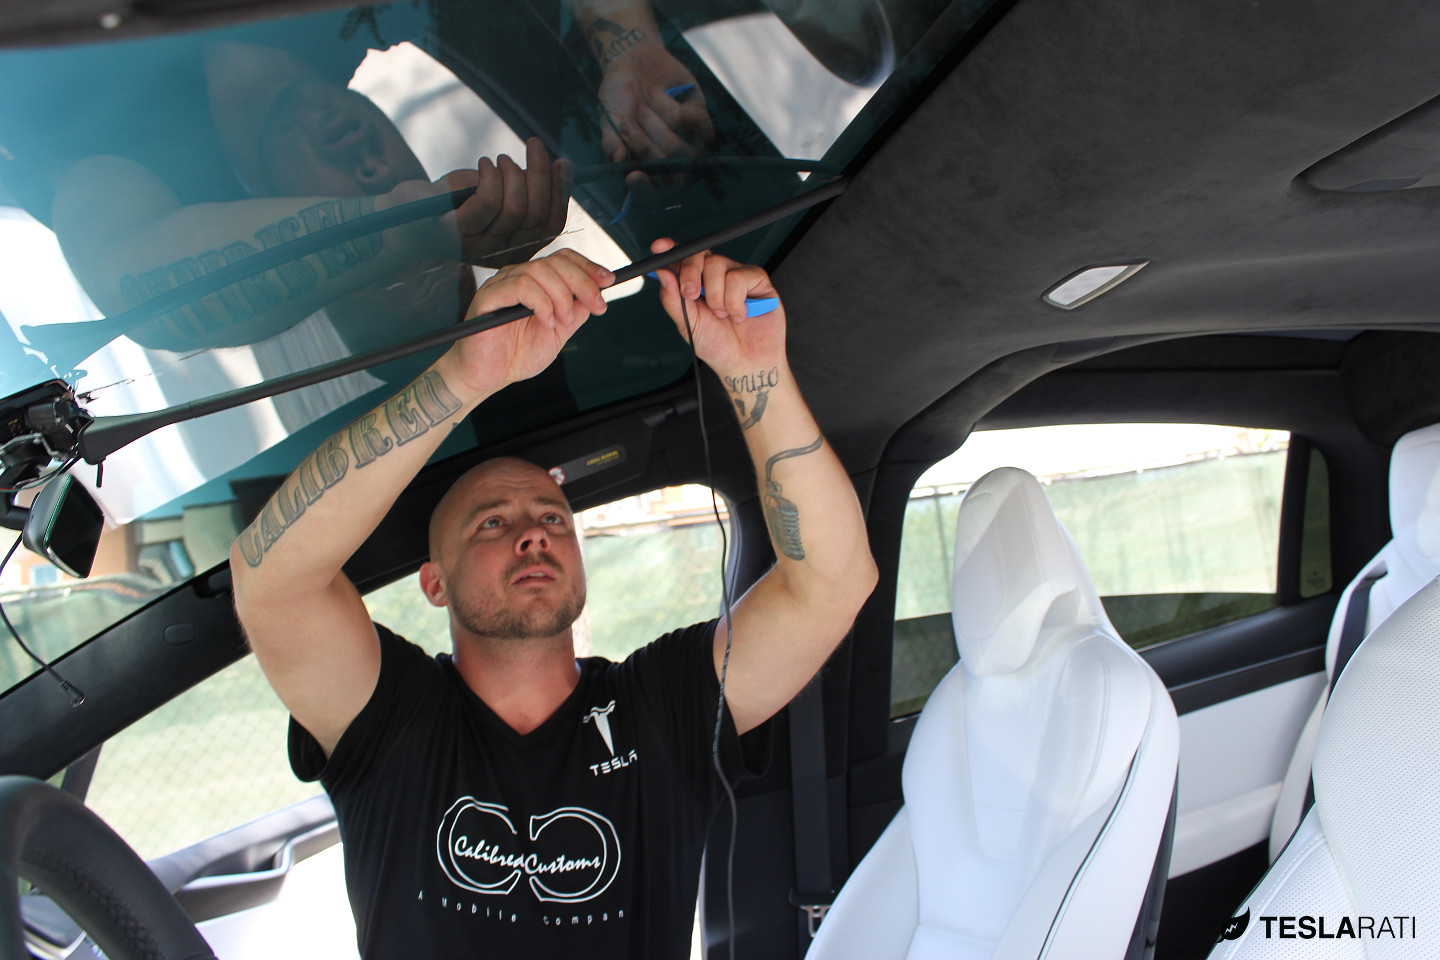
The most difficult part with installing a Tesla Model X dashcam is how to run wires to the front facing camera. In specific, how does one seamlessly run wire across an expansive all-glass panoramic windshield that doesn’t have much of a headliner? Adding to the challenge, the Model X is also equipped with a front facing Autopilot camera stashed away inside the rear view mirror housing – something you obviously have to tread delicately around. Power to that Autopilot camera is run through a thin plastic conduit that sticks onto the windshield with double-sided (extra-sticky) sticky tape.
In order to install our BlackVue front camera in this location, we had two options to run our wiring. We could either run the BlackVue power cord alongside the factory conduit, which frankly would have made the job very simple with the trade off of having a visual eye sore, or run the wire beneath the conduit making for an absolutely seamless factory look. We chose the later.

The Model X dashcam guru: Johnny at Calibred Customs
A quick search for “BlackVue” on the Tesla Model X Facebook group led us to Johnny at Calibred Customs of Los Angeles who apparently has become the Model X dashcam guru, and rightfully so. After speaking with him, we learned that he isn’t much of an internet or email guy, so phone calls and text messages are best, but more importantly we learned that we would become the eight Model X that he would be assisting with installation of a front + rear BlackVue dashcam. Okay, that sounds reassuring. Let’s do this.
Tips On Model X Dashcam Installation
As mentioned earlier, we won’t go into all of the details with installation simply because we didn’t do all of it, but we learned a few great tips that may help the adventurous DIY’er tackle the job.
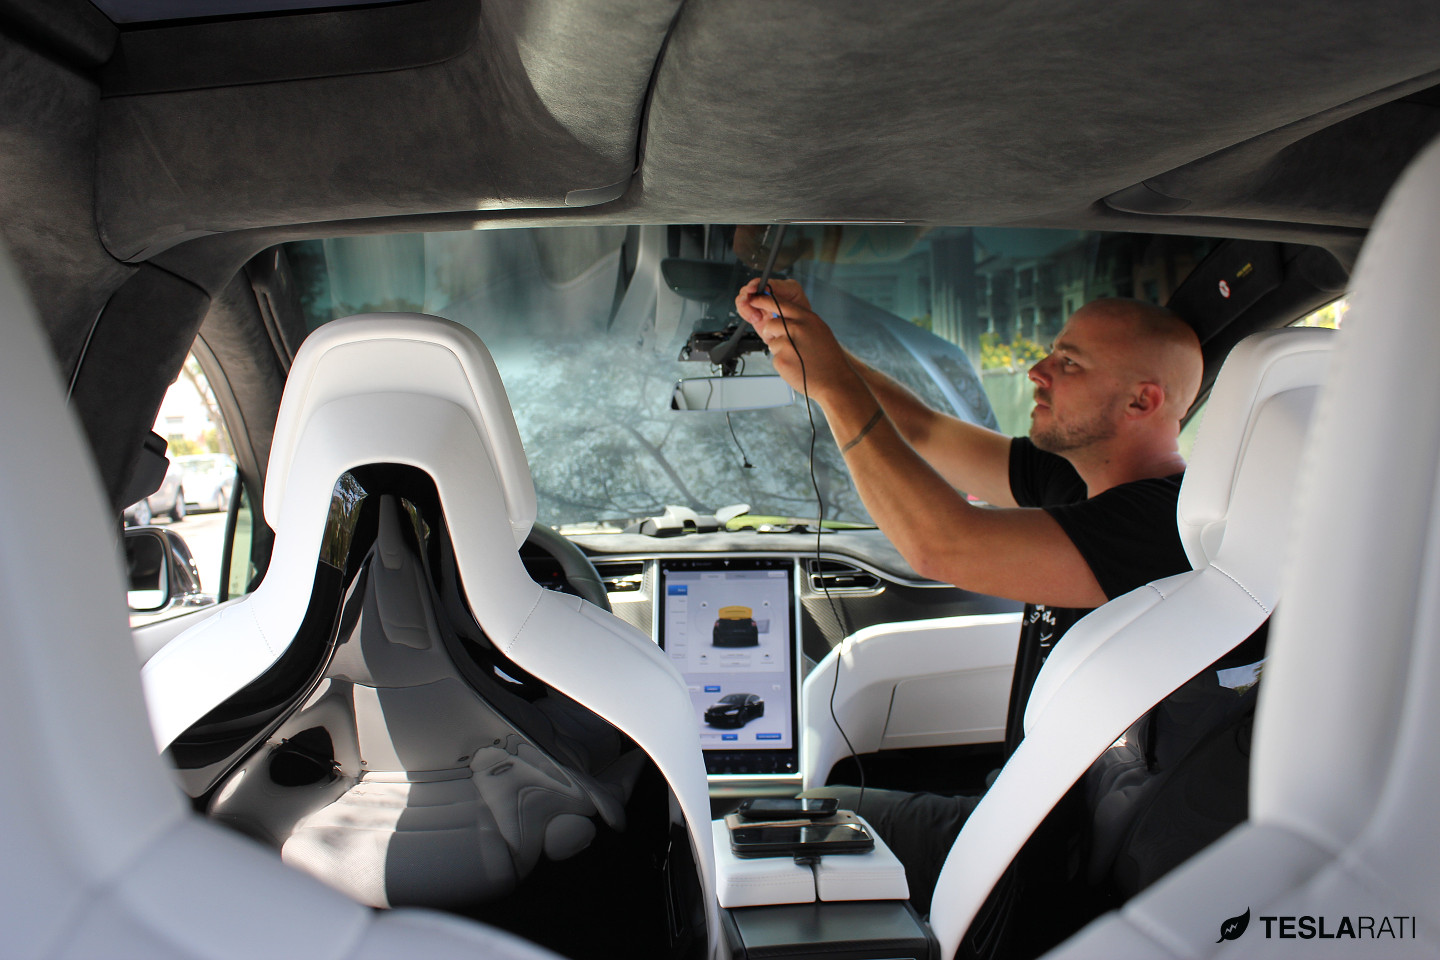
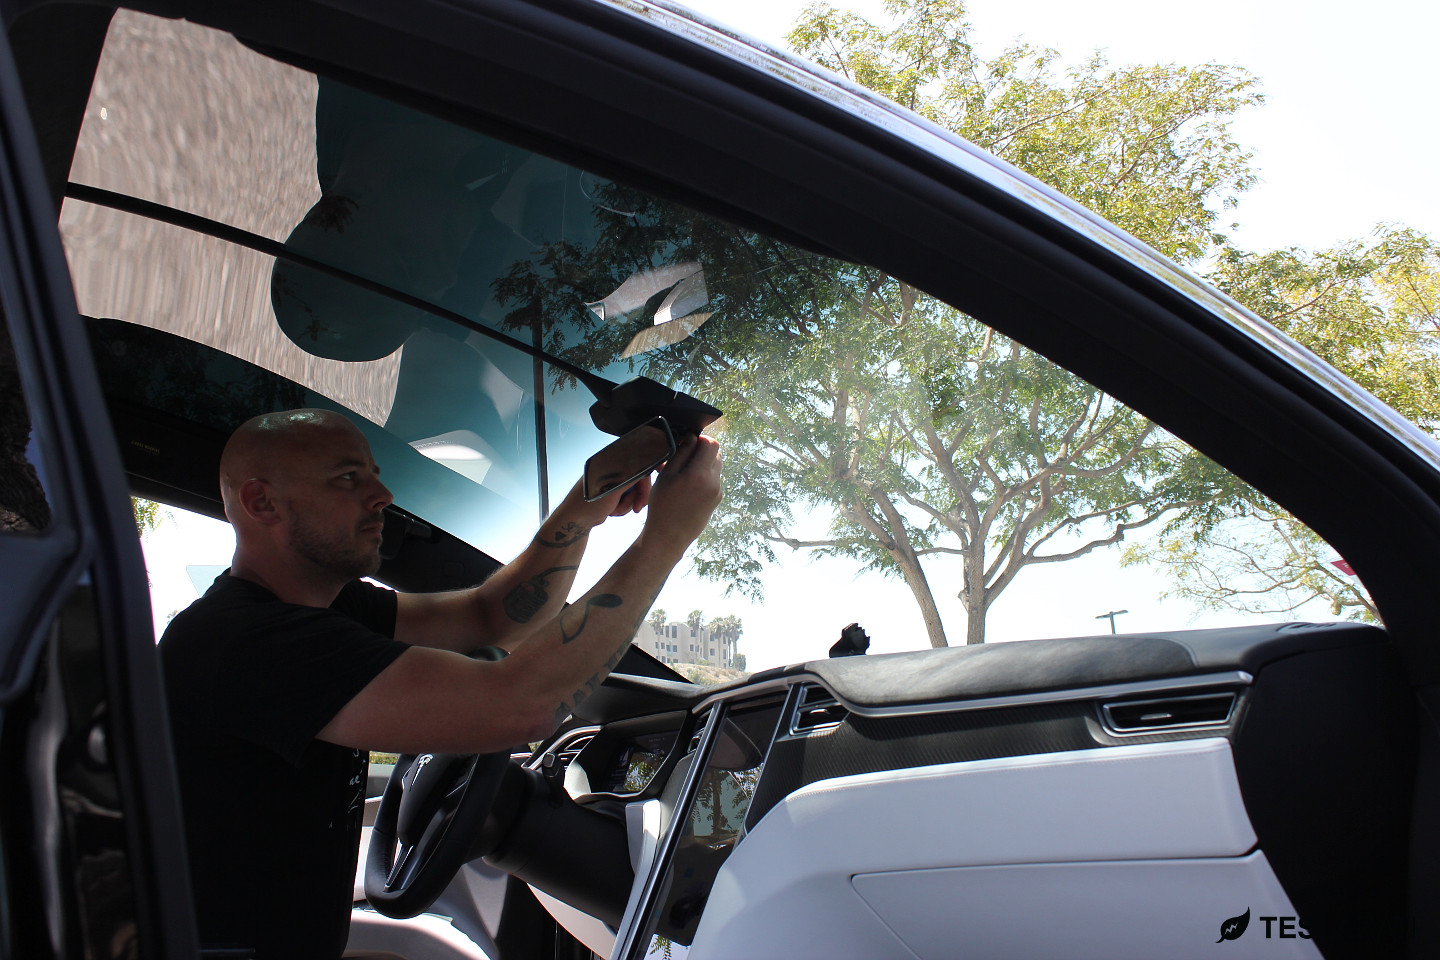
Front Mirror Housing
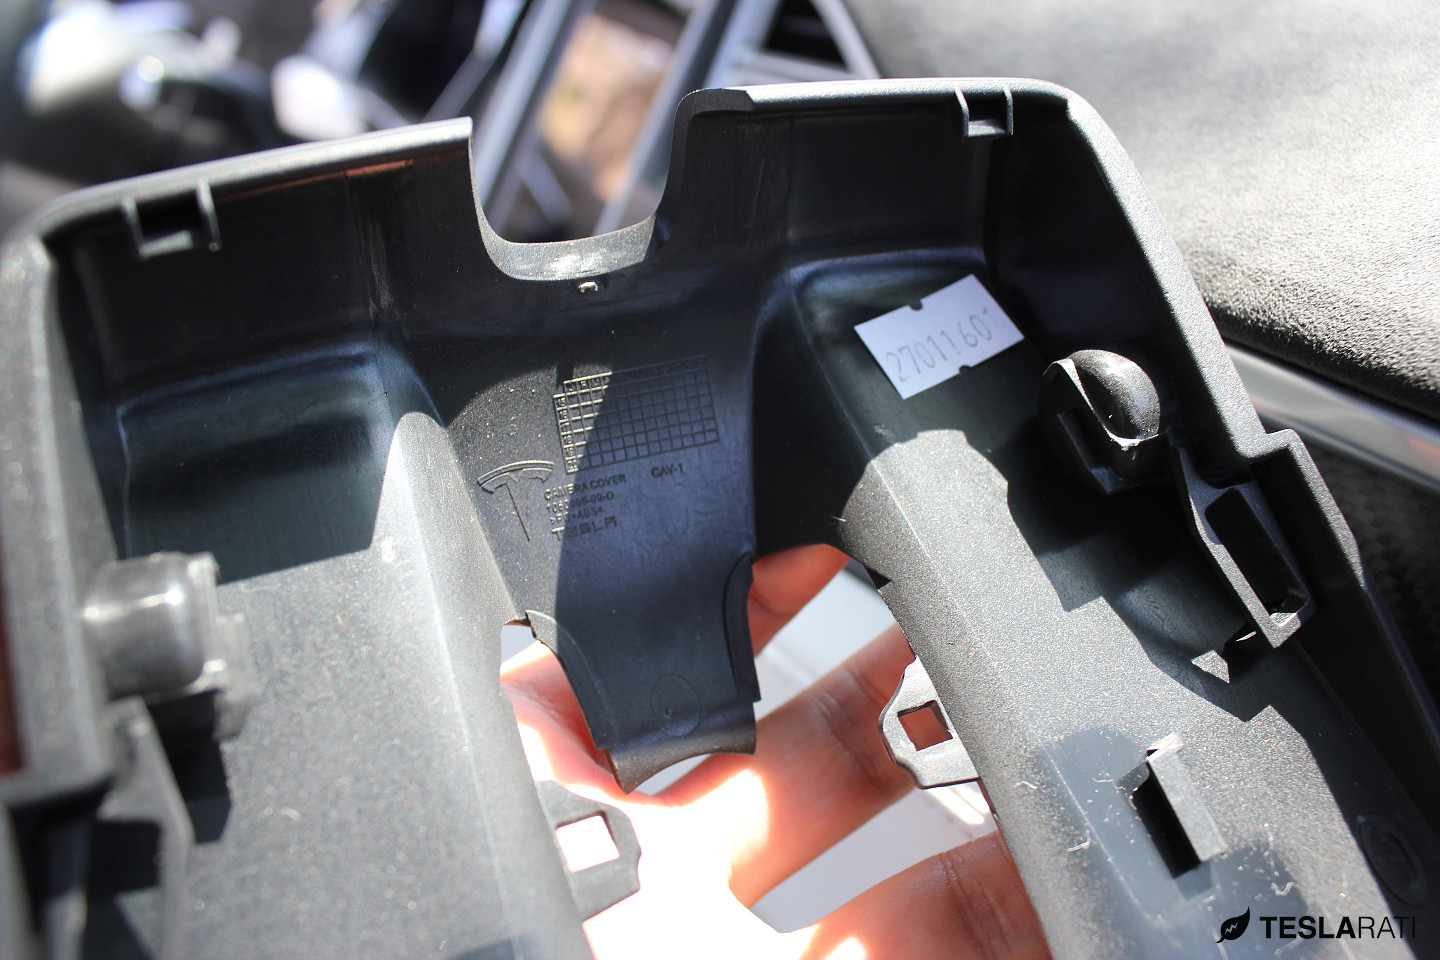
There are metal clips behind the plastic rear-view mirror housing. The housing itself can be gently pried open but be wary of the electronics behind the housing. That’s your Autopilot camera!
Wire Conduit
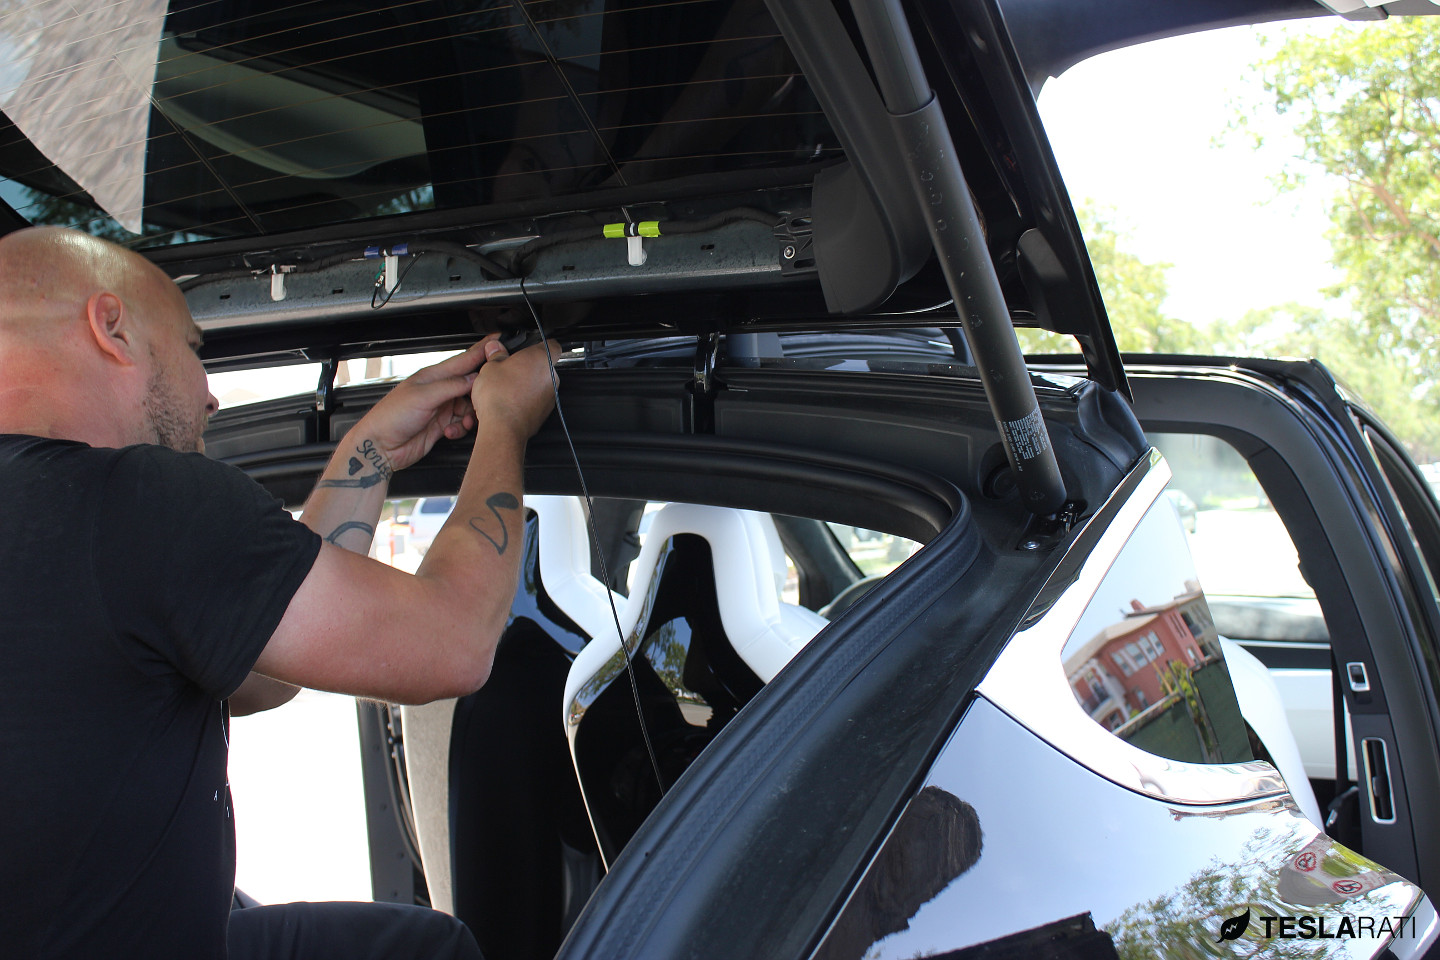
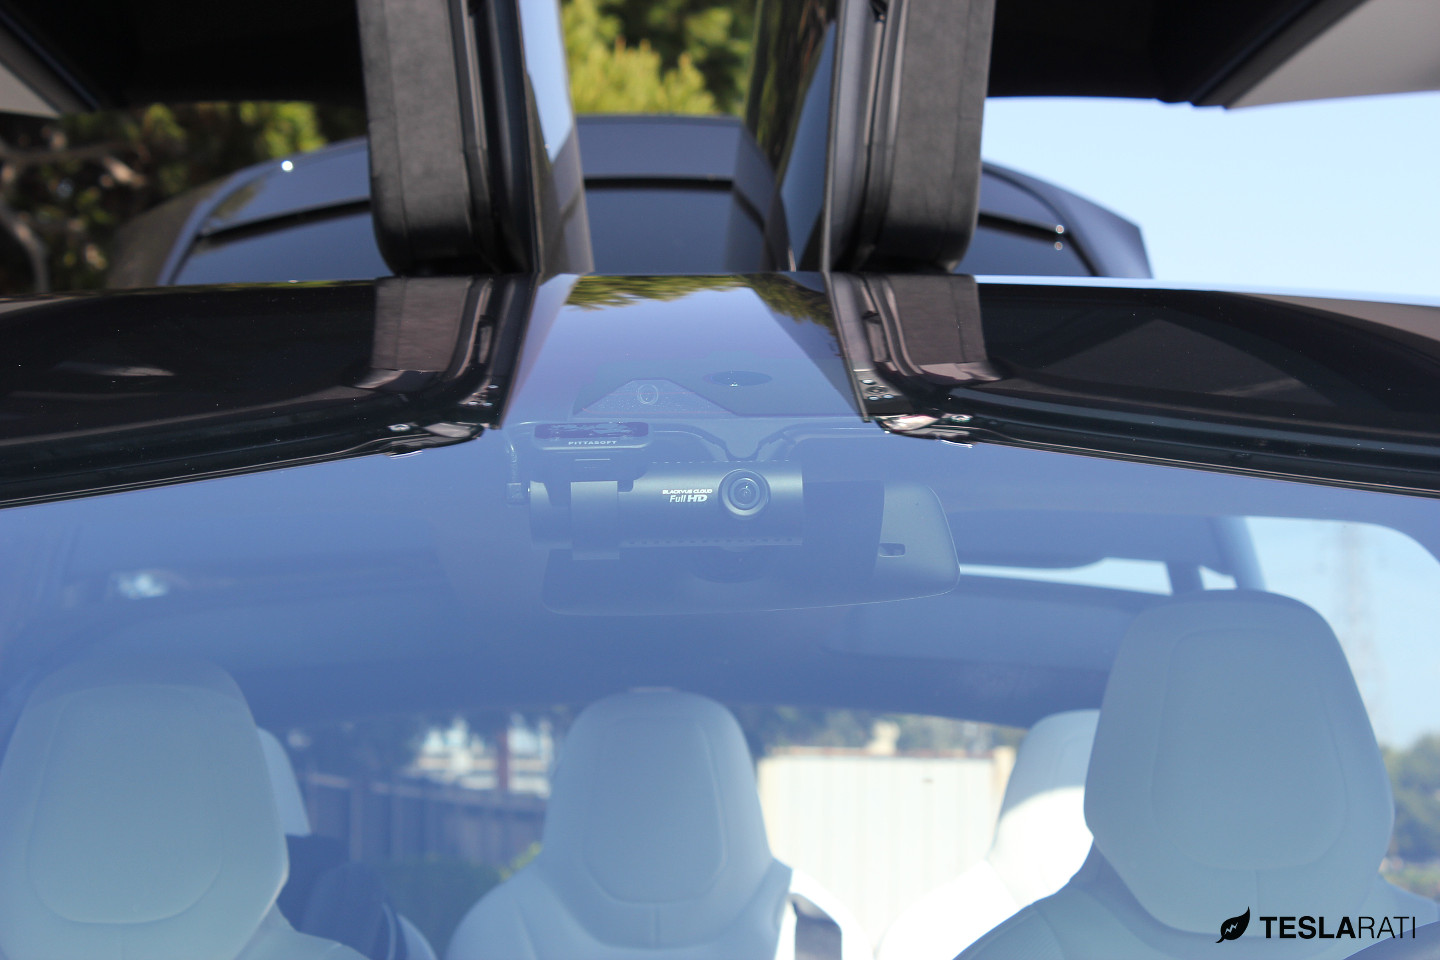
We wanted to make our BlackVue DR650S as factory-looking as possible so Johnny helped us run the power line and rear camera cable directly underneath the factory Model X conduit. There’s a few key points to keep in mind when doing so. One must carefully lift and detach the plastic conduit from the windshield, while being carefully not to break it. Once the conduit is off the windshield, run the dashcam wires inside of it and reattach the entire assembly back onto the windshield. Assuming you didn’t touch the factory adhesive with your fingers or dirty the existing double-sided sticky tape, one can secure the entire track back onto the windshield without the need for a replacement.
If done correctly, the end result is nothing short of spectacular, but we’d leave this portion to a pro.

Running Wires
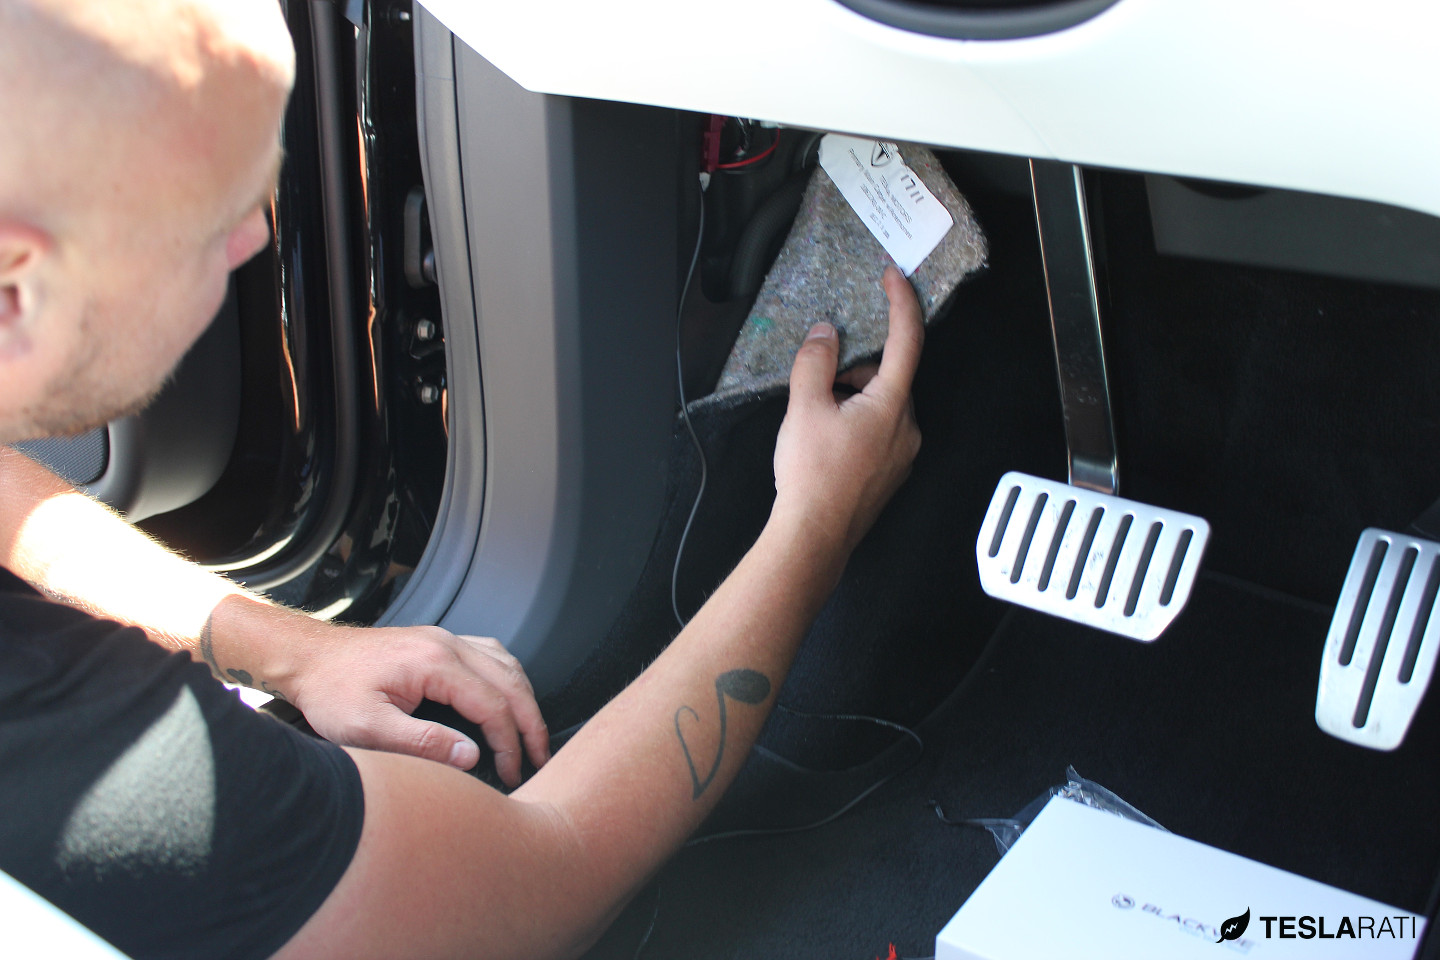
Since the BlackVue dashcam is equipped with a fantastic motion detector that activates recording when triggered, we decided to run the camera as always-on in order to provide our Model X with a little extra coverage when unattended. But instead of building a new OBD-II connector like we did when working on the Model S dashcam installation, we tapped power in the same vicinity, this time using a quick-disconnect connector.
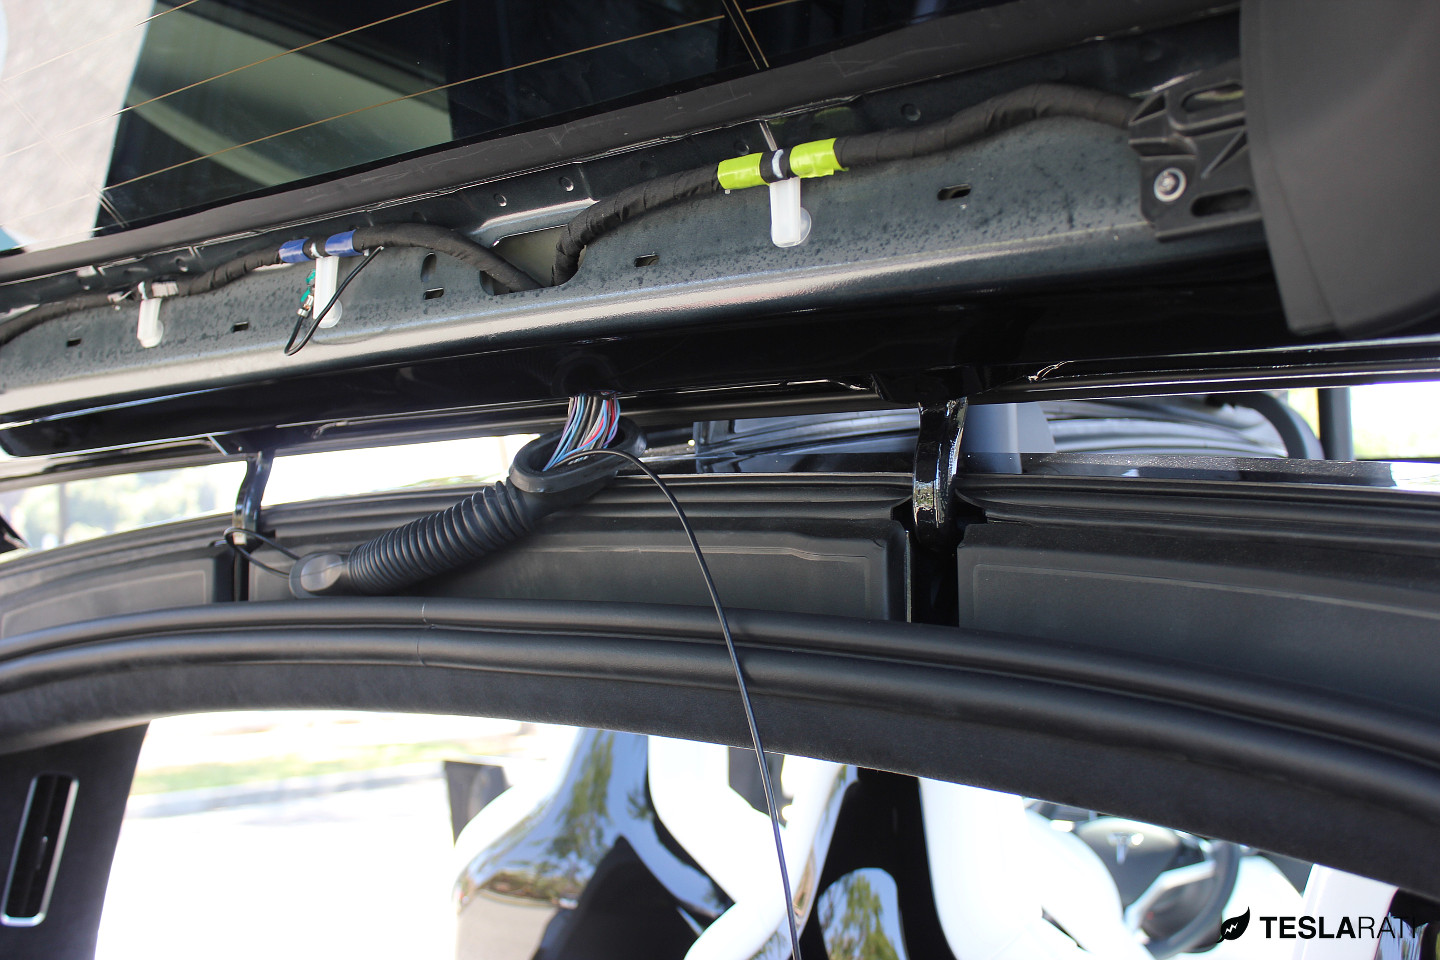
Running the cable that connects the front camera with the rear can be routed along the headliner and tucked underneath the weather stripping. The wire will run across the “backbone” of the Model X and terminate near the rear hatch.
Keep It Clean
By now, most of the install is complete and it’s just a matter of mounting the rear camera to the upper portion of the rear windshield, and connecting the front camera cable to it. We had previously skipped out on running the camera cable through the rubber grommet in the rear hatch because of the level of difficulty, but since we had Johnny the pro by our side, we asked him if he could handle it for us.
With the cable routed through the factory grommet, our Model X dashcam solution using the new BlackVue DR650S-2CH couldn’t have looked cleaner.
Summary
BlackVue has really refined their services since Firmware 2.0.0.0 that introduced cloud compatibility for the older DR650GW and now with the new DR650S. Their mobile app now allows for real-time streaming of the front and rear cameras directly from your phone. They’ve also added the ability to automatically download the videos over WiFi to their cloud service called BlackVue Cloud. Those with personal hotspots or in-vehicle WiFi will have the ability to automatically sync recordings into the cloud, but also remotely connect to the car via a mobile app and view, through the eyes of the front and rear cameras, what’s around the vehicle.
In true BlackVue fashion, the video quality in all lighting conditions is spectacular though tinted rear windows could hinder video quality in low lighting. Similar to previous cams, the DR650S is also equipped with parking mode designed to trigger recording by way of motion detection. It’s really meant to serve as additional protection in the event of vandalism or a hit and run.
Having a dashcam on your beloved Model X is a great way to capture life’s electric road trip moments. We’ll provide sample video and cover some commonly used features of the BlackVue DR650S-2CH in a follow up post. Stay tuned.


Back in 2019, YouTuber Simone Giertz, the self-proclaimed “Queen of Sh*tty Robots,” created a one-off Tesla Model 3 build that took the automotive world by storm. Fondly dubbed as “Truckla,” Giertz noted that the vehicle was actually her dream car — as crazy as that may sound.
Now almost four years later, the YouTuber posted an update on Truckla. And just like every other big project that one probably started, Giertz stated that she actually stopped working on Truckla when the vehicle was about 80% complete. The car is driving though, but a lot of stuff was not really working very well.
Thus, for her Truckla update, Giertz shared how most of her Model 3 pickup truck conversion was essentially completed. Truckla got a lot of detailing done, she got a slight lift, and she now has a functional tailgate. One has to admit, Truckla’s tailgate is pretty darn cool.
The “Queen of Sh*tty Robots” also opted to give Truckla a friend in the form of an automatic robot charger. Unlike Tesla’s rather interesting snake charger from years past, Truckla’s charger would come in the form of a rover, thanks to her friends at robotics platform Viam. Giertz aptly named Truckla’s robot charger friend “Chargela,” which is an appropriate name for such an invention.
Also true to form for Giertz, Chargela’s first encounter with Truckla was just a tiny bit awkward. One could say that Chargela may have just been a little bit nervous on his first try without human hands helping him. Most importantly, the system did work, so Giertz would likely keep using Chargela for her Model 3 pickup.
Teslas are very tech-heavy vehicles, so projects like Giertz’s Truckla are always remarkable. The fact that the Model 3 works perfectly fine despite having a good chunk of it cut off and turned into a pickup truck bed is mighty impressive any way one looks at it. Overall, Truckla will always be one of the coolest Tesla DIY projects to date, so any updates about the vehicle are always appreciated.
Truckla’s nearly four-year update can be viewed below.
Don’t hesitate to contact us with news tips. Just send a message to simon@teslarati.com to give us a heads up.
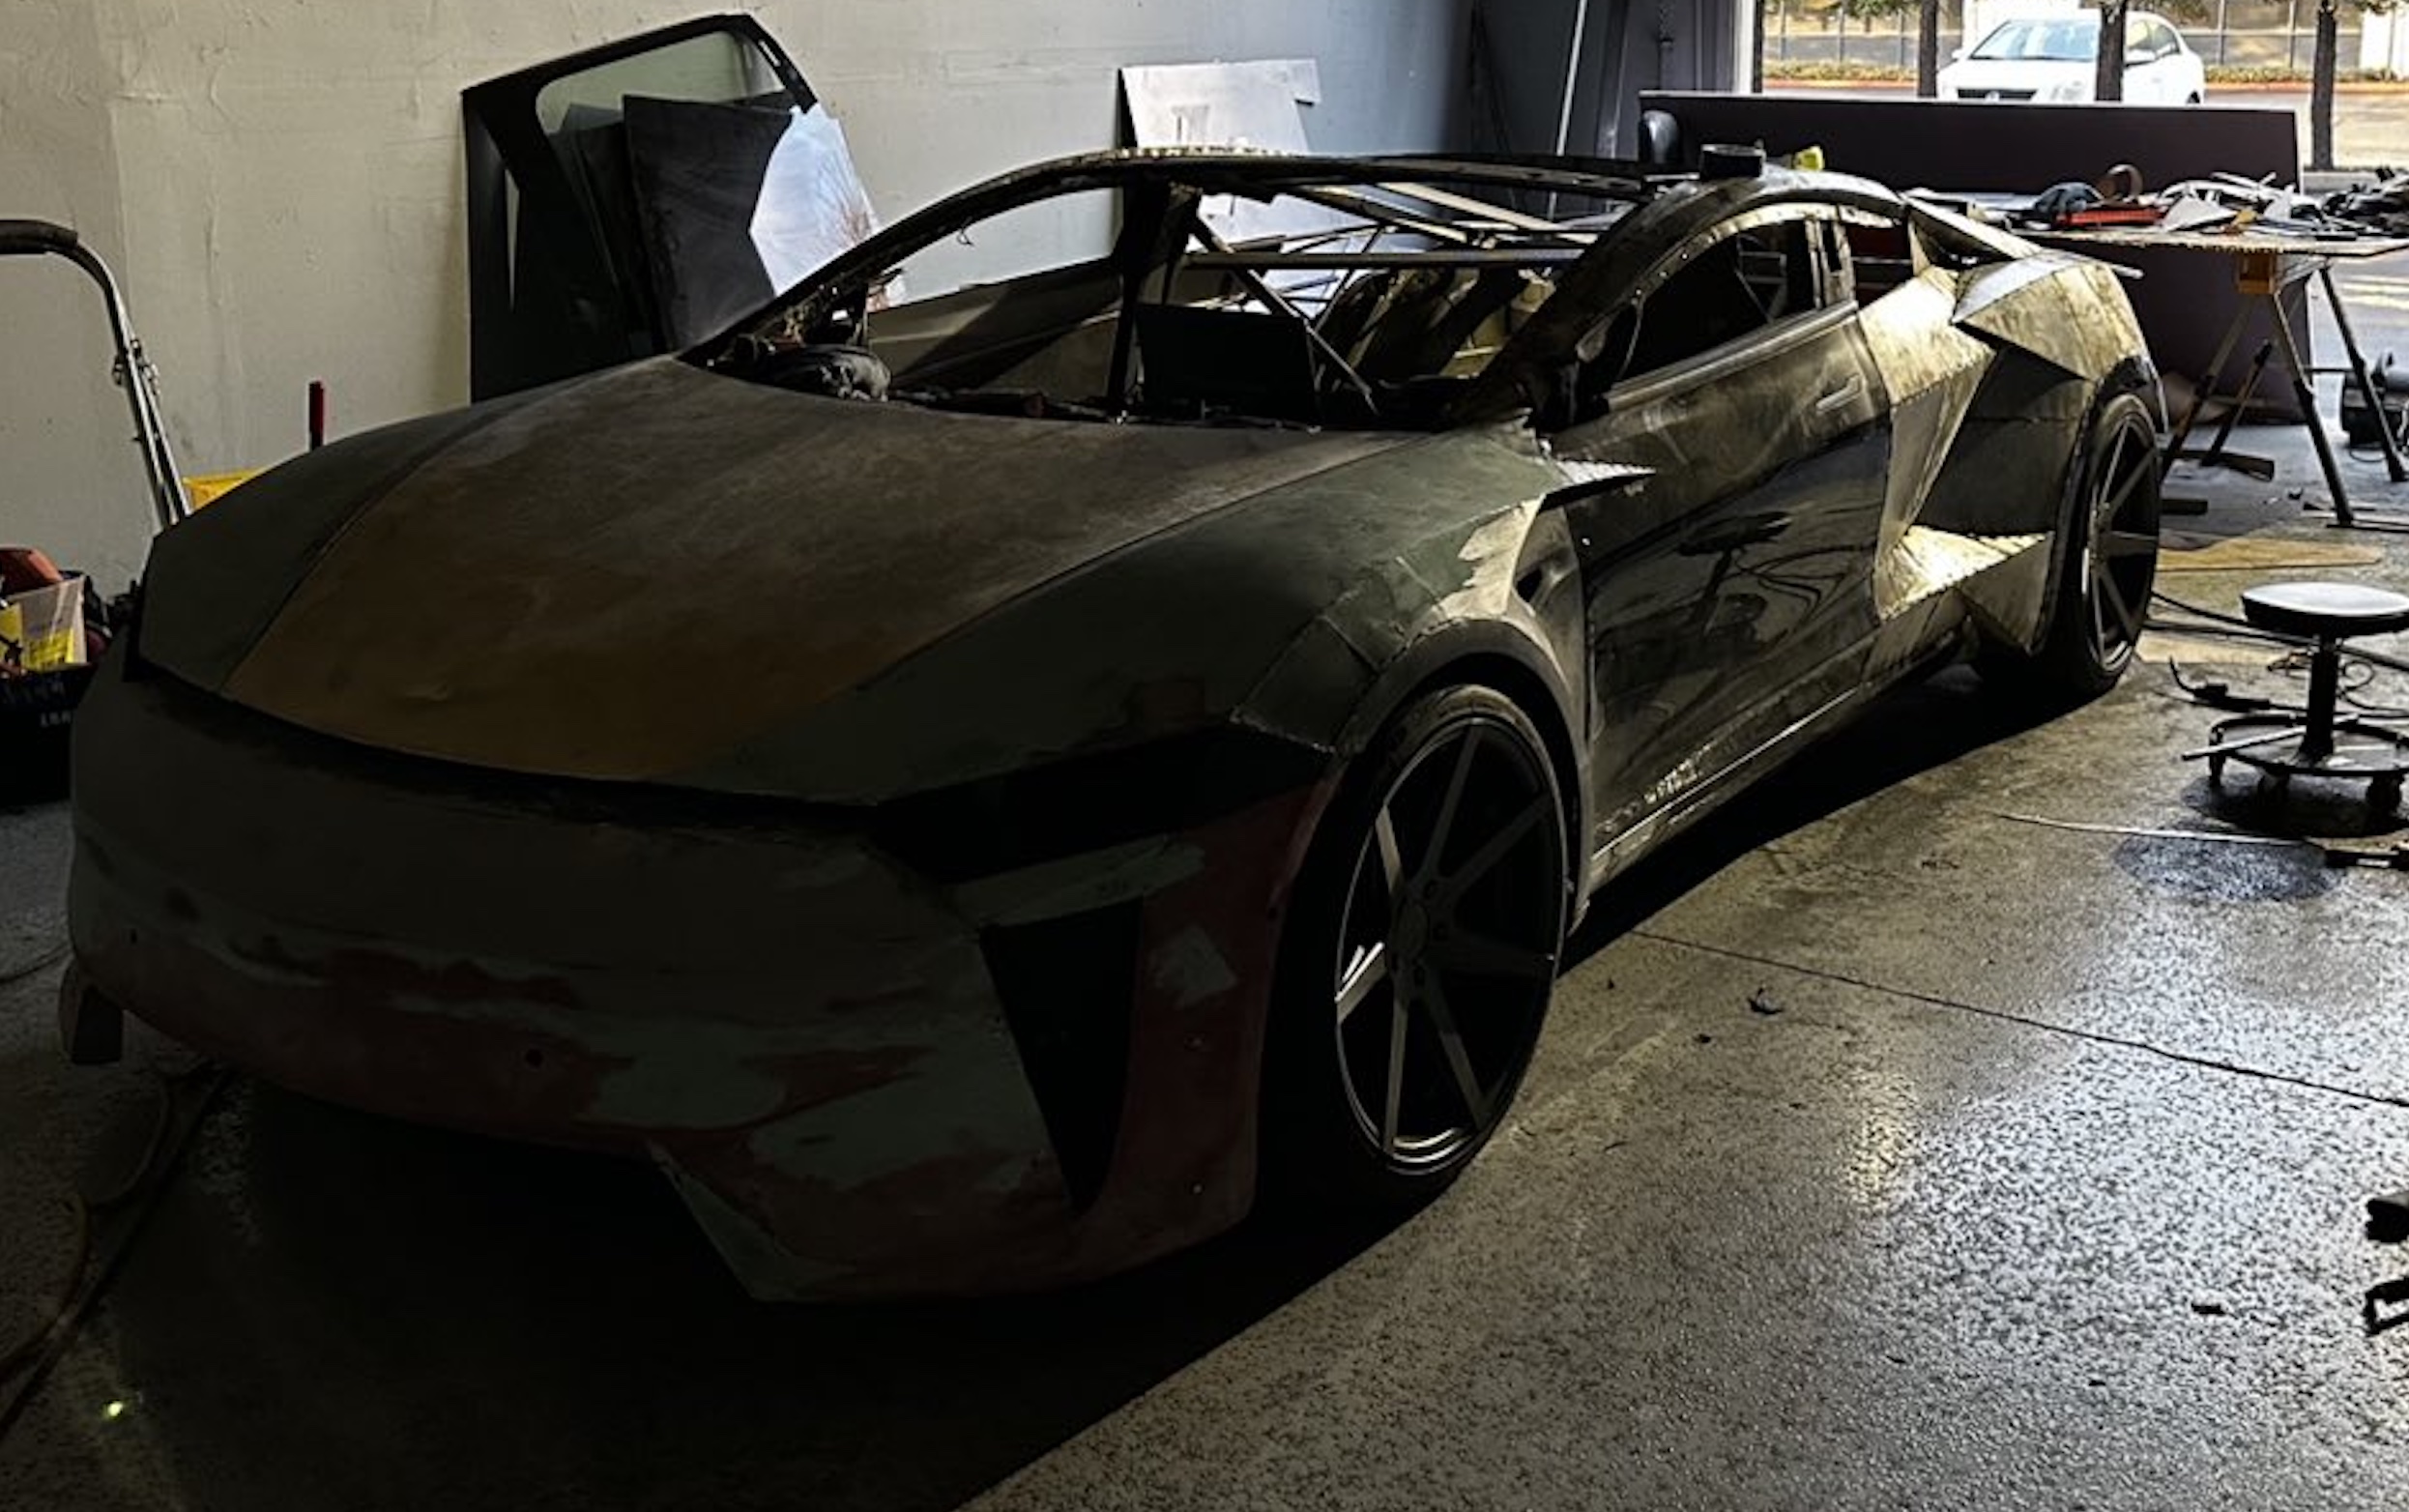
A Tesla owner is taking his hobby and love for electric vehicles to new levels by creating what could only be described as one of the coolest EV-related DIY projects to date. The idea for the project is simple: what happens when you cross a supercar with the Cybertruck? You end up with a two-seater CyberRoadster.
Tesla owner David Andreyev, who goes by the username @Cyber_Hooligan_ on Twitter, has spent the last few months creating a Cybertruck-inspired version of the next-generation Roadster made from a salvaged Model 3 Performance. Starting with a Model 3 Performance is an inspired choice, considering that it is Tesla’s first vehicle that has a dedicated Track Mode.
A look at Andreyev’s YouTube channel, which can be accessed here, shows the meticulous build that the Tesla owner has implemented on the project car. What’s particularly cool about the CyberRoadster is the fact that it’s being built with parts that are also from other Tesla vehicles, like its front bumper that came from a new Model S. Recent videos suggest that the project car’s rear bumper will be from a new Model S as well.
The journey is long for Andreyev, so the completion of the CyberRoadster will likely take some more time. Despite this, seeing the Tesla owner’s DIY journey on such an epic build is more than satisfying. And considering that the CyberRoadster is evidently a labor of love from the Tesla owner, the final results would likely be extremely worth it.
There’s a lot of crazy Tesla modifications that have been done as of late. But some, as it is with a lot of things on the internet these days, have become more silly gimmicks than serious automotive projects. Fortunately, car enthusiasts like Andreyev, who just happen to also love electric vehicles, are taking it upon themselves to create one-of-a-kind EVs that would surely capture the attention of anyone on the road.
Check out the latest video in the CyberRoadster’s creation below.
Don’t hesitate to contact us with news tips. Just send a message to simon@teslarati.com to give us a heads up.
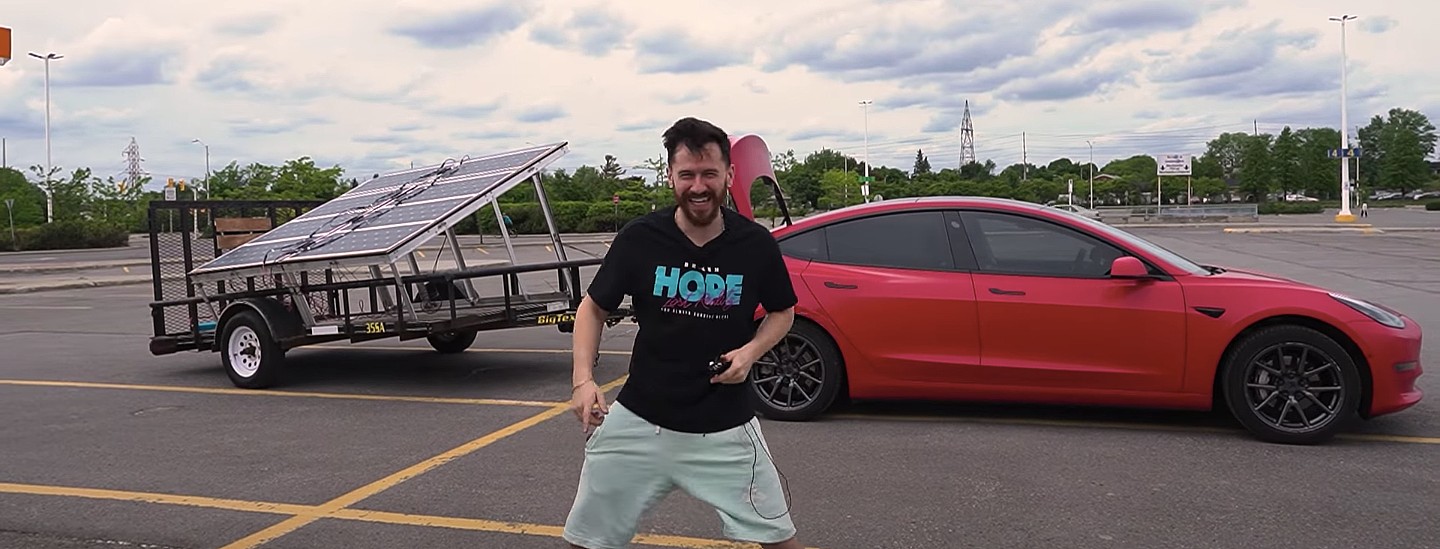
A Tesla owner has demonstrated a rather novel way to charge his Model 3. In a recent video, Sean Callaghan of the ItsYeBoi YouTube channel opted to use a series of off-the-shelf solar panel sheets onto a towable trailer to create a mobile charging unit for his all-electric sedan.
Callaghan planned to use only the sun and the solar sheets purchased from e-commerce platform Wish to charge his Model 3. The solar panel sheets would collect energy from the sun and transfer it to a control panel. The control panels were connected to batteries that would hold the energy—the batteries connected to an inverter, which would then charge the Tesla Model 3.
The entire assembly would provide the Model 3 with about 800 watts of energy on a completely sunny day. However, Callaghan shot the video when weather was overcast, so the entire solar panel trailer build only managed to provide around 300 watts throughout the YouTube host’s test.
To put this into perspective, a 100 volt home wall outlet provides 1.4 kilowatts of power, or 1,400 watts. Therefore, the 300-watt solar panel assembly built by Callaghan was producing less than 25% of the energy of a typical wall outlet. This is pretty marginal compared to Tesla’s 250-kilowatt V3 Superchargers, which provides 250,000 watts, or about 833 times as much power as the makeshift solar panel build.
However, Callaghan’s goal was not to charge the vehicle quickly. He explained the idea came from a previous video where he used a $5,000 Wish-purchased wind turbine to charge his Model 3. He wanted to test the effectiveness and efficiency of the system, which was questionable due to the time it would take to charge the battery fully.
The Model 3 battery pack is 78 kWh, and with Callaghan’s 300-watt system charging his electric vehicle, it would take 260 hours to supply the Tesla’s battery to full capacity.
In the past, electric vehicle enthusiasts have asked Tesla CEO Elon Musk why the company’s vehicles do not contain solar glass roofing, which would charge the car while the owner is driving. Musk has explained that the efficiency of this idea is challenging and likely would not provide an ample amount of range.
When asked about the idea of putting solar panels on the top of Tesla’s vehicles in 2017, Musk responded that the idea was “Not that helpful, because the actual surface of the car is not that much, and cars are often inside. The least efficient place to put solar is on the car.” It also would not be cost-effective for Tesla because “the cost of the panels and electronics, R&D and assembly would never pay for itself in the life of the vehicle, compared to charging from the wall in your garage,” Quartz noted.
That being said, Tesla plans to implement solar panels onto the motorized tonneau of the upcoming Cybertruck. The idea was discussed on Twitter when Musk stated that the optional feature would add “15 miles per day, possibly more” when parked in the sunlight. Also, fold-out solar wings could help capture enough solar energy for 30 to 40 miles a day.
Watch Sean Callaghan’s video of his makeshift solar panel trailer below.

Armored Tesla Cybertruck “War Machine” debuts at Defense Expo 2025

Tesla Megapacks chosen for 548 MWh energy storage project in Japan


